Last p/n was 3577 848. Still listed as a current part, but it has grown very expensive...about $40!
| Slant Six Forum https://slantsix.org/forum/ |
|
| Twiggy - Long Rod Aluminum Block Engine Build-up https://slantsix.org/forum/viewtopic.php?t=23948 |
Page 18 of 25 |
| Author: | SlantSixDan [ Sun Nov 04, 2007 8:26 am ] |
| Post subject: | |
Last p/n was 3577 848. Still listed as a current part, but it has grown very expensive...about $40! |
|
| Author: | Doctor Dodge [ Sun Nov 04, 2007 9:33 am ] |
| Post subject: | |
The oil filter "anti-drainback" valve / standpipe assembly is the factory's solution to the drainback problem common with vertically mounted oil filters. It is a shame that the aftermarket oil pump manufactures "side-stepped" the use of this key part. At first they said, "get one from the dealer" and when those went N/A the line was: 'You don't need it, the check valve is built into the oil filter". ( I'm not sure if they know which filters have a decent check valve and / or a by-pass valve 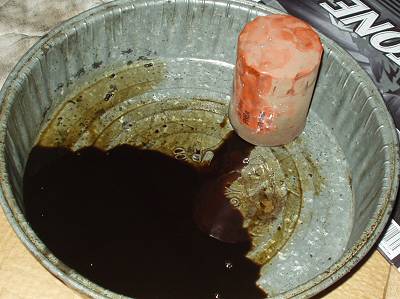 The factory's solution worked pretty good so I have always saved the used standpipes / check valves I come across. The trouble is that used ones don't seal well because the slightest bit of dirt or varnish build-up prevents the "crude" valve from making a complete "air tight" seal. 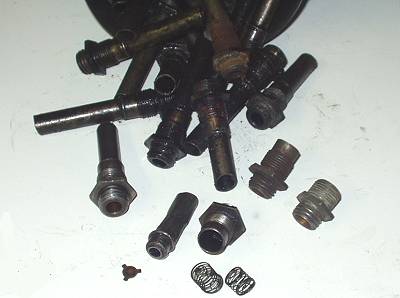 As with most assemblies, this one can be dis-assembled and serviced to "better then new" specs. The big challenge is getting the pressed-in standpipe tube out of the base where the valve is. The best way to do this is by using a 1/4 NPT tap and threading it into the top of the tube, this gives you a way to grip the tube so it can be removed from the base with-out smashing it's OD. 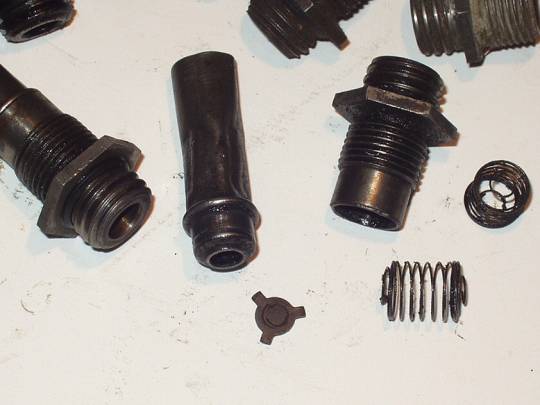 Be careful when you take the tube out of the base, the small 'disc valve' is spring loaded and will 'fly away'... I wrap a rag around the assembly at this step in order to prevent flying parts. Once open you can clean and resurface the valve contact area. Notice how small the hole is... I open that up a little but it will not let you go to much larger or you loose all the seating area at the base of the tube. Use the 'fingerprint' on the disc as a guide. 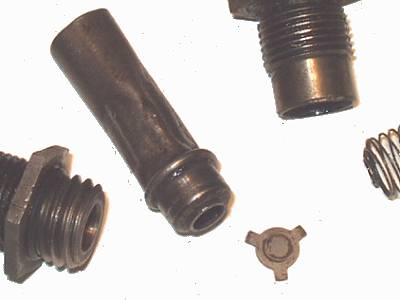 Getting a good press-fit back into the base is a challenge with this item. The tube and / base can get distorted so it does not hold together in a solid manner. The usual alternates are not good choices... Braze or solder it on, the heat will destroy the light spring. How about some good epoxy, hot engine oil and epoxy are not a good combo but this is a better option then brazing, just keep any excess off the valve below. (which is almost impossible, don't ask how I know...) A quick tack weld with a MIG is about the only method I feel good about but it is a "high skill" type of welding operation, one slip-up and you have a hole in the thin wall stand-off tube and watch the heat build-up, that hair thin wire spring is not far away. Also note that there is an O-ring at the base of this assembly, replace it with a new one and be sure it seals. All your great check valve repair work will be for not if air leaks around the standpipe mounting threads and the oil pump's body. DD |
|
| Author: | SlantSixDan [ Sun Nov 04, 2007 9:58 am ] |
| Post subject: | |
Quote: As most of us know, the filter has no way to hold oil if there is an incoming air path that breaks the suction.
...unless you use the filter with the built-in standpipe. NAPA Gold #1806, Wix #51806, Baldwin #BT-216, Purolator #L30137. This is an oil filter intended for industrial & construction equipment engines. It has all the same dimensions and specs as the regular filter, except it contains a built-in standpipe to keep the filter full of oil after shutdown. It is a relatively expensive filter (RockAuto quotes $7.71 for the Wix).Quote: The factory's solution worked pretty good so I have always saved the used standpipes / check valves I come across. The trouble is that used ones don't seal well because the slightest bit of dirt or varnish build-up prevents the "crude" valve from making a complete "air tight" seal.
I've also kind of wondered about flow restriction due to the valve, which as you say is a pretty crude device. I ponder having some new standpipe/check valves made up, with a ball check rather than a plate valve, but then again, the factory's initial standpipe design contained no valve. It was just a plain standpipe. Seems to me today's filter antidrainback flaps are better than ever (if you buy a quality filter) so a plain standpipe with no check valve might actually be the better solution: the standpipe plus the filter's antidrainback flap would keep the filter almost full of oil after shutdown, you'd have no flow restricting check valve in the oil's flow path, and fabrication would be a simple matter of overdrilling a plain filter fitting and pressing in a piece of metal tubing cut to the appropriate length.
|
|
| Author: | Doctor Dodge [ Mon Nov 05, 2007 10:53 pm ] |
| Post subject: | |
Quote: ... I've also wondered about flow restriction due to the valve, which as you say is a pretty crude device. I ponder having some new standpipe/check valves made up, with a check valve rather than a plate valve, but then again, the factory's initial standpipe design contained no valve. It was just a plain standpipe.
I do use a "no valve" standpipe on engines in the race car but that car has an Accusump so there is always oil pressure, even before you start it.Seems to me today's filter antidrainback flaps are better than ever (if you buy a quality filter) so a plain standpipe with no check valve might actually be the better solution: the standpipe plus the filter's antidrainback flap would keep the filter almost full of oil after shutdown, you'd have no flow restricting check valve in the oil's flow path, and fabrication would be a simple matter of overdrilling a plain filter fitting and pressing in a piece of metal tubing cut to the appropriate length. Seeing that this is a easy part to change, I can start with an empty standpipe in Twiggy and see if the filter's antidrainback flap does the job. If I get long periods of no oil pressure at start-up, I will swap-in a reworked factory standpipe / checkvalve assembly. Anyway... I have been welding baffels into the oil pan, getting it ready to install. DD 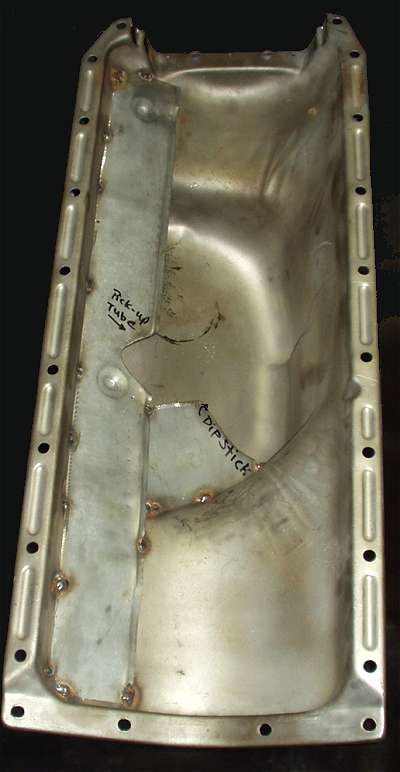
|
|
| Author: | argentina-slantsixer [ Tue Nov 06, 2007 2:05 am ] |
| Post subject: | |
pardon my ignorance... what's an accusump? |
|
| Author: | bwhitejr [ Tue Nov 06, 2007 4:19 am ] |
| Post subject: | Twiggy build |
I hope Doc will has this thread archived or turned into a How-To Article when he is done. This is priceless. bwhitejr |
|
| Author: | Joshie225 [ Tue Nov 06, 2007 7:35 am ] |
| Post subject: | |
Quote: pardon my ignorance... what's an accusump?
http://www.accusump.com/It's a floating piston hydraulic accumulator. |
|
| Author: | slantzilla [ Tue Nov 06, 2007 12:58 pm ] |
| Post subject: | |
My good motor has no standpipe and no Accusump. Bearings still look great. Too bad a standpipe won't save pistons. |
|
| Author: | Doctor Dodge [ Tue Nov 06, 2007 9:06 pm ] |
| Post subject: | Accusump... |
Here is a photo of the Accusump oil accumulator as it is installed in my race car. It sits just to the other side of the shifter, next to the transmission hump. 40 psi of oil pressure is waiting inside the unit, ready to prime the engine with a flip of a lever. DD 
|
|
| Author: | Doctor Dodge [ Wed Nov 07, 2007 10:56 pm ] |
| Post subject: | Back to the Bottom... |
Installed the reworked pick-up tube and did some fit checks with the oil pan and also tried some windage trays I have. 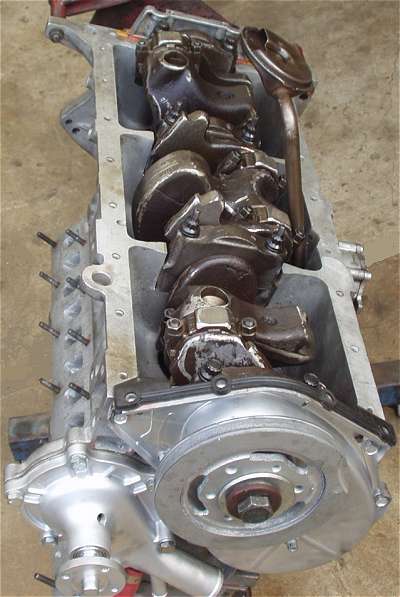 Both the Mopar Performance and the Mike J. windage trays hit all over the place when using the early (60-66) oil pan. This pan is especially close in the front, under journals 1 & 2. My options are to cut the front section off the tray and then continue to "work it" to fit under the pan or leave the windage tray out and instead, weld-in an oil scraper into the oil pan itself. Uhmmmm.... So I have been welding on the pan and that option is looking pretty good. As part of the fit check process, I position the pick-up and dab some grease around it's outside edge, place the oil pan onto the engine and get a "finger print" of where the pick-up ends-up on the floor of the pan. 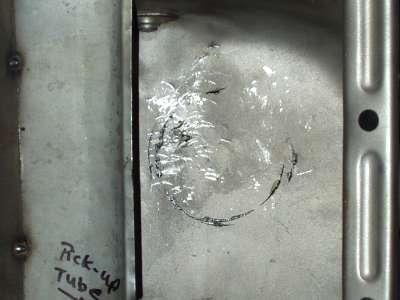 The photo also shows where I 'worked' the pan out with a hammer in order to get right amount of clearance between the pick-up screen opening and the floor of the oil pan. DD |
|
| Author: | 68barracuda [ Thu Nov 08, 2007 2:56 am ] |
| Post subject: | |
Hi Doc! Well SA Design has got "How to rebuild your small block Mopar"..... I think they need "How to rebuild and hot rod your slant six" - I will buy copy number 1 Fantastic info |
|
| Author: | dakight [ Thu Nov 08, 2007 3:34 am ] |
| Post subject: | |
What amazes me is the detail and meticulous planning and checking. I would never have thought to check the pickup tube clearance. This thread has an enormous wealth of good information that is applicable to all engines, not just the aluminum slant. |
|
| Author: | 66aCUDA [ Thu Nov 08, 2007 6:11 am ] |
| Post subject: | |
I agree 100% this should turn into a rebuild article. I cant believe all the things I have picked up. Thanks Doc Frank |
|
| Author: | Doctor Dodge [ Thu Nov 08, 2007 11:24 pm ] |
| Post subject: | More Oil Pan Welding & Fitting... |
Thanks for the "thumbs-up" everyone... it's nice to know that people are getting good ideas and info. from this thread. So I welded-in one more oil pan baffel and did my final fit checks, all systems are "go" for final "button-up". 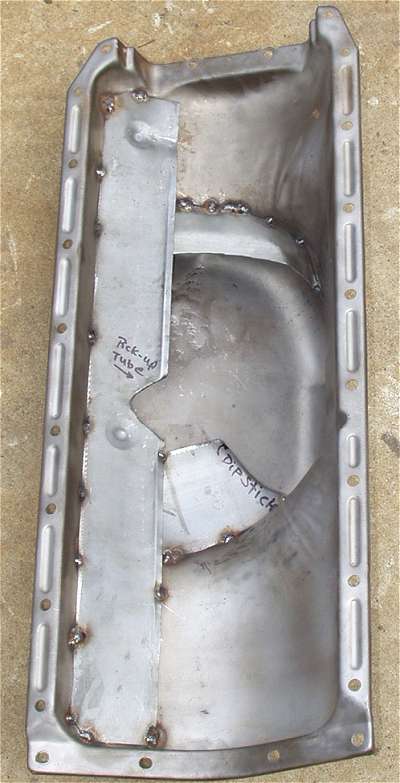 I am still second guessing myself on the windage tray installation. Here I have special ARP main studs with tray mounting provisions and I am not going to use them. 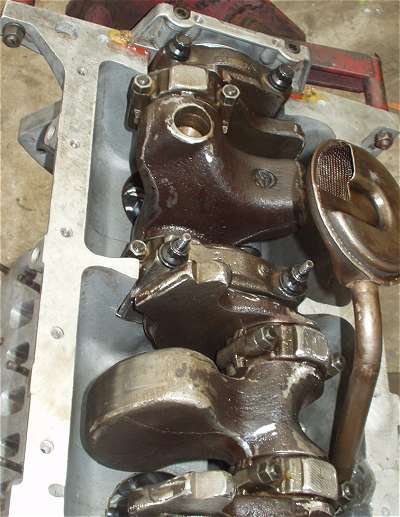 That last photo shows another one of my "could be better" issues. See that deeply drilled crank "bob", this is one of those cranks that did not make the 'cut' for a high HP race engine. I don't like to see any deep drilling into the rear balance bob, especially the one that is right in the connecting cross-section between pins 5 & 6. I need to get the pan installed and stop looking at this stuff. DD |
|
| Author: | argentina-slantsixer [ Thu Nov 08, 2007 11:42 pm ] |
| Post subject: | |
Doc, your mind is playing you wrong... although I understand you... I don't like that big hole neither... On the other hand, as you remark, this would be a "low" revver and by the guessed final weight on the assembled motor, your hp/weight ratio will be a blast. |
|
| Page 18 of 25 | All times are UTC-08:00 |
| Powered by phpBB® Forum Software © phpBB Limited https://www.phpbb.com/ |
|