You are truly a sick man, Doc. Get that thing together and give us some flogging reports!!
Lou
| Slant Six Forum https://slantsix.org/forum/ |
|
| Twiggy - Long Rod Aluminum Block Engine Build-up https://slantsix.org/forum/viewtopic.php?t=23948 |
Page 19 of 25 |
| Author: | Dart270 [ Fri Nov 09, 2007 4:48 am ] |
| Post subject: | |
You are truly a sick man, Doc. Get that thing together and give us some flogging reports!! Lou |
|
| Author: | slantvaliant [ Fri Nov 09, 2007 7:23 am ] |
| Post subject: | |
Doc, did you make templates to fabricate your pan baffles? Those sure would be handy ... |
|
| Author: | AnotherSix [ Fri Nov 09, 2007 3:36 pm ] |
| Post subject: | |
You could fill that hole with some assembly lube so you don't have to look at it, then you can try to forget how deep it is. It will probably never make any difference. I don't mean this in a bad way, but I would expect the main caps to tear out of the block before the crank is a problem on this engine. It will probably all just work fine anyway. I prefer to use a windage try on any engine that I am trying to get the most out of if possible. I would consider a short tray but if it cannot be supported well enough to avoid cracking I guess thats the end of it. Is a pan mounted tray or even a pan mounted screen out of the question? Those baffles look real nice. That alone should make quite a difference. Otherwise these engines only have gravity for oil control. Any thoughts about a block mounted scraper that fits inside the pan line? It looks like holes would have to be drilled thru the side of the block to avoid doing anything to the the webs. Then maybe some mounting blocks could be bolted to the engine block. I have been hoping to come up with this sort of solution for the engine I am planning. I want to run a scraper and tray, but do not like the idea of going without a pan gasket on a street engine that I don't plan on pulling out for a long time. |
|
| Author: | Doctor Dodge [ Fri Nov 09, 2007 9:22 pm ] |
| Post subject: | |
Quote: You are truly a sick man, Doc.
I don't think the deep balance hole is a problem for this engine, if I thought otherwise, I would not have installed that crank into Twiggy.Get that thing together and give us some flogging reports!! Lou I did want to point-out this feature... most engine builders would not even notice something like this but honestly, I would not use a crank with this kind of deep balance hole in a higher HP SL6 engine... better cranks are not that hard to find. As for the in pan scraper, that should help keep some of the windage directed down into the sump. Here is a "file photo" of the windage trays I test fitted to the engine and decided not to use. 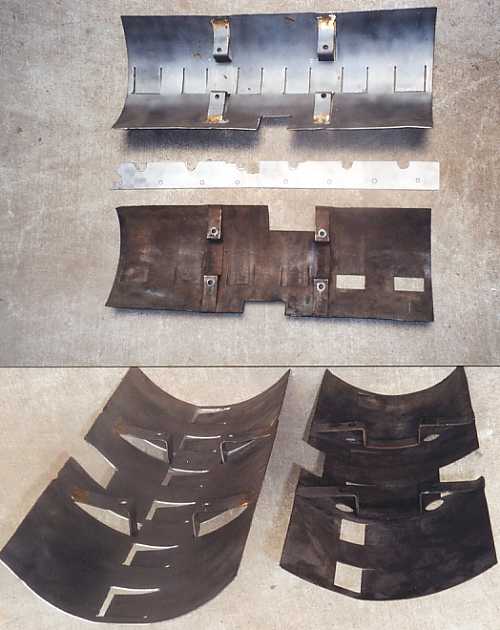 The pan goes onto the engine tomorrow and then it is down to the final 'bolt-on' items and engine install. Intake and exhaust manifold selection is the next big decision area. How much do I want to 'limit' the output of this engine through carb. size? DD |
|
| Author: | Doctor Dodge [ Sun Nov 11, 2007 8:53 am ] |
| Post subject: | |
OK.... the oil pan is on, we are in the "final moments" of this engine's assembly. Here is what the long block looks like. DD 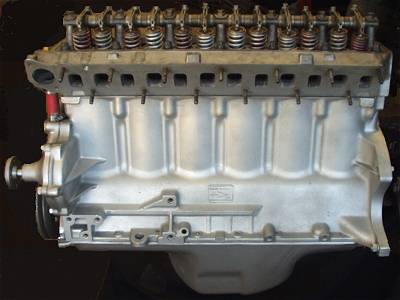
|
|
| Author: | Doctor Dodge [ Wed Nov 14, 2007 10:20 pm ] |
| Post subject: | Intake Manifold Prep... |
Spent some time grinding and cleaning-up the welds on a ebeam welded 2bbl intake manifold. This unit weighs-in at 6 lbs. 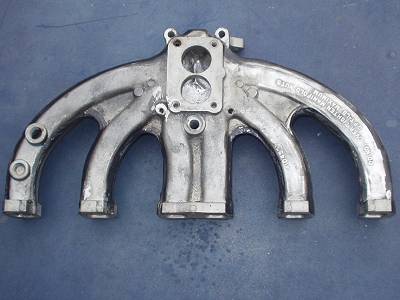 Had to do a little welding on the floor of the manifold to fix a crack and to fill-in the EGR port. Did some shaping to the welded floor to direct any liquid fuel over to runners 2 & 5. 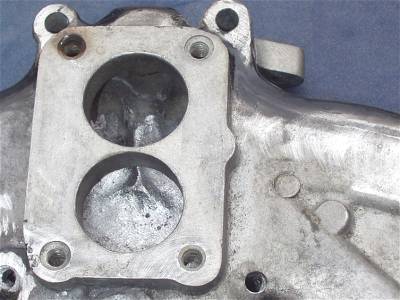 The next step was to apply epoxy to the weld joint... talk about a "time bandit" job. Those of you who have seen the weld joint quality on these manifolds know why I spent the time to cover all the "poc-marks" with epoxy. 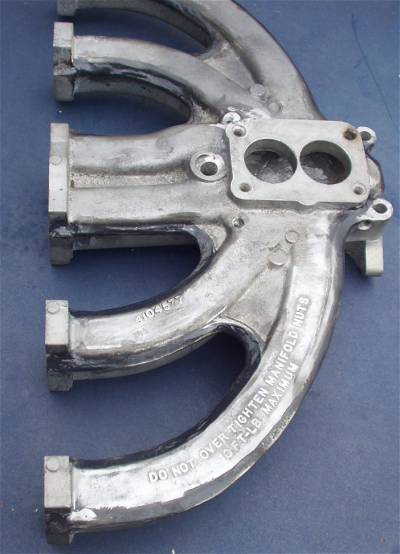 I could not resist drilling 4 extra holes into the corners... DD 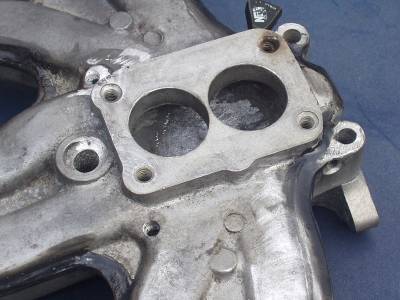
|
|
| Author: | sandy in BC [ Thu Nov 15, 2007 6:36 am ] |
| Post subject: | |
I didn t realize there was enough meat there for nitrous nozzles..... |
|
| Author: | moparfreak77 [ Thu Nov 15, 2007 2:59 pm ] |
| Post subject: | |
"Do not overtighten manifold nuts, 0 FT-LB maximum" If "0" is the max, whats the minimum? |
|
| Author: | Wizard [ Thu Nov 15, 2007 3:30 pm ] |
| Post subject: | E-beam manifold |
This is first time I saw this e-beam welded alum manifold, 6lb is feather! Cheers, Wizard |
|
| Author: | sandy in BC [ Thu Nov 15, 2007 3:43 pm ] |
| Post subject: | |
I like them......they cost nothing (full of holes doncha know)....weigh nothing....can be welded...epoxied. My new Offy seems like a clunker compared to the EBeam. They mind me of the never assembled Hubley Metal Model car kits my mom used to bring home from the Sally Ann for me. The ones that you screw together....die cast....some finishing required. 7 lb 1/24 scale Duesenburg. Nice polishing Doug. |
|
| Author: | Doc [ Thu Nov 15, 2007 6:56 pm ] |
| Post subject: | |
Quote: "Do not overtighten manifold nuts,
It use to say "10" but the 1 has been sanded down a bit. 0 FT-LB maximum" If "0" is the max, whats the minimum? Yes, these are super thin and light manifolds, you really have to be careful with them... over-tightening is a real problem with these intakes. I still have some sanding work to do but it's coming along. DD |
|
| Author: | Doctor Dodge [ Fri Nov 16, 2007 5:51 am ] |
| Post subject: | |
Quote: I didn t realize there was enough meat there for nitrous nozzles.....
The outer 2 holes are easy, there are a couple of recesses at the top, outer wall of the plenum that I drill into, doing that keeps the nozzle out of the air path.The two inner holes are harder to get positioned correctly. You have to find where the port's inner divider walls, between runners 2 & 3 and 4 & 5, end at the plenum opening. These areas have the most material below them. Even with that, I did build-up the area around the rear inner hole with weld while I had the TIG fired-up. That position just needed a little more material in order to get a nice tapped hole. I take some mesurments then use a small drill to make a test hole, with the goal of being centered right on the divider and right at the end if it. Once you have the first small test hole, you "fine tune" the hole's position with other small holes, then drill-out the hole "cluster" to the needed tap size. If positioned as planned, the large final hole breaks out the end of the divider wall, to expose the end of the nozzle. This process also works on the 1 bbl version of this manifold. Oh... be sure you have a NOS nozzle and a carb available before you start drilling. You need to make sure the holes are placed so the nozzles do not hit the carb. or get in the way of linkage travel. DD 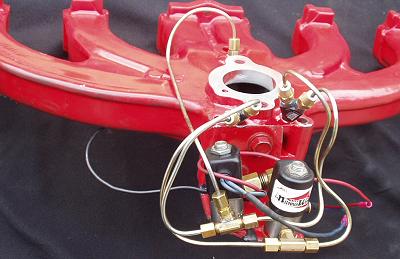
|
|
| Author: | LUCKY13 [ Sat Dec 08, 2007 11:45 am ] |
| Post subject: | |
I love the paint your using, might I ask what it is? Also what was the results of this build, has it been finished? Jess |
|
| Author: | Doctor Dodge [ Sun Dec 09, 2007 9:18 am ] |
| Post subject: | |
I use OSH brand spray paint. (Orchard Supply Hardware) www.osh.com Today they are a part of Sears from a corporate standpoint. I could never figure-out if OSH contracts with a small independent paint maker or has a major spray paint maker relabel for them. I do like their "Bright Red" because it is the closes spray can color match to the orange / red color used on the early Slants. As for Twiggy's paint, there is not much used on that engine! I had to get Twiggy off the engine stand to make way for the "twins"... The last steps needed to finish that build is to add the manifolds and the thermostat, then do the install. DD |
|
| Author: | Pat Dawson [ Mon Dec 10, 2007 7:35 am ] |
| Post subject: | |
Just thought I'd throw in a picture of MY freshly home rebuilt aluminum stocker, well... just because. Hope this photo works and is not too big. BTW, this was 1 1/2 years and 4000 miles ago. 
|
|
| Page 19 of 25 | All times are UTC-08:00 |
| Powered by phpBB® Forum Software © phpBB Limited https://www.phpbb.com/ |
|