Slant Six Forum
https://slantsix.org/forum/

Buster - Long Rod, Light Pistons, Light Crank Alm. Block SL6
https://slantsix.org/forum/viewtopic.php?t=29183
Page 5 of 13

Author:  Doctor Dodge [ Wed Aug 12, 2009 10:22 pm ]
Post subject: 

So.... all the machine work, all the fit checking, all the additional machine work, a job change, more fit checking... a renegade teenager, more machine work, another fit check... we are ready to put this engine together!

NOTE TO SELF: These "one-off", never done before proto-type engines take waaayyyy to much time and $$$. (I know that... but build them anyway... someone has to do it!) :roll:

OK, here is the "ready to break" cast crank:

Image

I do not know if I am happy or sad that it weighs-in at 56 lbs:

Image

This photo shows the mains, with the crank ready to install.
Note that mains 1, 2 and 4 use the wider, forged crank main bearings and the thrust bearing (#3) uses the cast crank bearing inserts and the top insert needs to have the oil feed hole redrilled, so it lines-up with the aluminum block's re-located oil feed passages.

Image

in the end, the crank was "in & out" of the block 3 times as I had to keep grinding additional clearance into little "rubbing places"... the rear main (#4) was were the most work was needed.
This photo show that the main caps and the aluminum block itself, took additional grinding to get the crank to clear.

Image

In the end, the crank ended-up .032 further back (rearward) then planned.
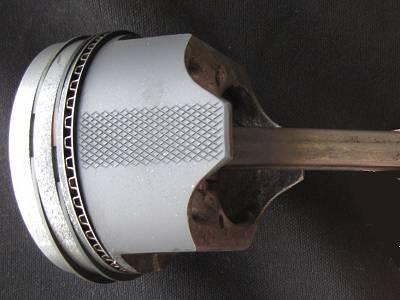
Not a "show stopper" but a "live & learn"... now we get to install the piston / rod assemblies!
DD

Author:  plymouth6 [ Wed Aug 12, 2009 10:39 pm ]
Post subject: 

I am looking forward to see how this comes together as I am sure we all are Doc. You are the /6 Mad Scientist :wink:

Author:  Polara1974 [ Thu Aug 13, 2009 5:23 am ]
Post subject: 

Excelent!!! I very interested in the results!!! I'm planing my next rebuild and since I have the two crankshafts at home already (forged & Cast) I might now consider using the cast one ...

Lets see what happend!!

Author:  Doc [ Thu Aug 13, 2009 10:57 am ]
Post subject: 

Here is a photo of the assembly.

Image

As usual, this aluminum block ended-up with a rope type rear main seal, due to the amount of main line honing the block needed to get it straight.
The rope seal always makes for some extra drag when the crank is first installed but it seems to be "working-in" as I put more rotations on it.
DD

Author:  Doctor Dodge [ Sat Aug 15, 2009 8:45 am ]
Post subject: 

All the piston / rods are assembled and the ring packs installed.
I weighed an assembly and it is 1190 grams total, which equals 2 lbs, 10 onces.
So with 6... 16 lbs of piston/rod assemblies go into Buster.
I took a shot of the long rod assembly next to a factory 225 set. (6.7 rod)
DD

Image

Author:  Doctor Dodge [ Sat Aug 15, 2009 9:03 am ]
Post subject: 

A close look at the piston shows that we knurled them to get a tight fit to the bores.
As noted in an earlier post, when all the block work was finished, we had to take the bores oversize by an extra .003 to get a couple of walls to clean-up.

Instead of running loose pistons, we "dusted-off" a "obsolete" piston knurler and went to work.
The machine worked great and we had a nice diamond pattern on all the units in 30 minutes.

The trouble with this process is that you knurl to an oversize, then have to "file down" the peaks of the knurled area for your desired fit... that process took a couple of hours.

Once everything was sized correctly, the skirts were cleaned and sprayed with a moly anti-friction coating.
DD

Image

Author:  stonethk [ Sat Aug 15, 2009 9:37 am ]
Post subject: 

Piston knurler..interesting.
Did you knurl the non-thrust side of the piston only (seems that would need it more) or both?
TOTALLY KNURLY DUDE! :D

Author:  Doctor Dodge [ Sat Aug 15, 2009 5:54 pm ]
Post subject: 

Both sides of the pistons got knurled...
My hope is that the grooves in the knurl pattern help hold some oil and keep the skirts from scuffing... and this engine is going to need that.

Why? because Buster will not have active oil "spurt holes".
When you use cast crank bearings, in forged crank con rods (narrowed 198 rods) the oil spurt hole in the narrow cast crank bearing does not line-up with the drilled hole in the forged crank con rod.

Image

People I talk with say... "oil spurt holes are not needed - don't worry about it" so we did not spend the time to re-drill the con rod bearings and therefore, will not throw a bunch of extra oil around the inside of this engine.
DD

Author:  madmax/6 [ Sat Aug 15, 2009 8:45 pm ]
Post subject: 

Have seen knurled guzzi pistons,and valve guides.Allways thought of it as a numb nuts fix.In your case Doug,I see this as a good numb nuts fix,I actually think it will work here,your still a really good numb nutter.Mark

Author:  Doctor Dodge [ Sun Aug 16, 2009 9:21 am ]
Post subject: 

That is why you don't see many piston knurlers around these days... it's just better to buy a new set of pistons.
In my case it was $50.00 to knurl vs $500.00 to get a custom piston set made at 3.448 oversize.
I have to say that this is the first time I've knurled a new set of pistons, before they were ever run. :shock:
DD

Author:  Doctor Dodge [ Mon Aug 17, 2009 10:27 pm ]
Post subject: 

OK... the short block is together. :D
Everything went as planned except for the need to "true" the #4 piston / rod assembly and we ended-up swapping the piston / con rod assemblies between position #1 and #5. Doing this gave us better cylinder to cylinder cc volumes. (we had .004 difference in deck height from #1 to #6... my machinest owes me one)

Anyway... here is the moment I have been waiting for... here is whereTwiggy becomes Buster... or better stated as "Twiggy II"

Here are the two engines side-by-side.

Image

This is where air tools really come-in handy... 15 minutes later,Twiggy is stripped down to her short block... with all her needed parts, ready to swap onto Buster.

Image

The biggest parts to swap-over are the cam/lifters and the head.
The cam went like "clock-work"... I had notes on the installed position in Twiggy and guess what... the cam installed with-in 1 degree when it went into Buster.

The head took a little extra work... we took it apart and installed iron valve guide liners into all the aluminum intake guides. The amount of guide wear, and oil getting thru made this a "must do" before this aluminum head goes onto Buster.
Seeing that the aluminum head has a number of extra coolent holes and the block still has a lot of open deck, we decided to drill two additional 5/16 coolent "bleed holes" in the head gasket, both on the spark plug side, one between cylinders 1 & 2 and the other between 3 & 4. Our hope is that this will help promote even cooling across the head. (front to back)

This build should go pretty fast from here so ask questions now... it will not be long before this engine is "buttoned-up" and going into a car.
DD

Author:  darrt wells [ Tue Aug 18, 2009 8:02 pm ]
Post subject: 

Hey doc could you maybe post a pic of your aluminum head? Ive read that you had one, but ive never seen a picture of it !

Author:  Doc [ Wed Aug 19, 2009 8:46 am ]
Post subject: 

Here is a "file photo" of the prototype aluminum SL6 head I have.
This shot was taken when we did the pocket porting work.

Image

This is basically an 1960 head design / casting, made out of alumium instead of iron. It does not have the better combuster chamber design.
This pic shows the head assembled, note the 10 extra "core holes", just inboard of the head bolt holes.
These holes lead to the water jacket and are blocked when the head gasket is installed.
We drilled the head gasket in two places in alignment with a couple of these holes, to let a little more cool block water flow into the front section of the head.
DD

Image

Author:  Doc [ Wed Aug 19, 2009 5:04 pm ]
Post subject: 

Everything is assembled except for the manifolds.

The only change from the Twiggy build is that the special aluminum HV oil pump we used on Twiggy was swapped for a standard, 5/8 thick impeller, factory die cast oil pump.

Image

Seeing that Buster has tight side play on the con rods, no oil spurt holes, tight crank end play and tighter cam to cam bearing fit... this engine should not need a lot of extra low RPM oil volume.
The standard oil pump that went onto Buster received the full "porting & blueprint" treatment and a case hardened drive gear so all should be good with that change. (fingers crossed)

So I am back at the same decision point I had with Twiggy, what intake and exhaust to use... it is likely that Buster will get an up-grade, to a SuperSix and Dutra Duals.
DD

Author:  Doc [ Thu Aug 20, 2009 11:04 am ]
Post subject: 

Here is a shot of the assembled long block, passenger side.

Image

I cleaned, resurfaced and "prepped" the manifolds last night so we should be installing the set tonight.
If all goes well, we will swap this engine into the car over the weekend. :D 8)
DD

Page 5 of 13 All times are UTC-07:00
Powered by phpBB® Forum Software © phpBB Limited
https://www.phpbb.com/