Slant Six Forum
https://slantsix.org/forum/

Engine Block Oiling System Prep
https://slantsix.org/forum/viewtopic.php?t=29492
Page 1 of 2

Author:  Doc [ Fri Jun 13, 2008 11:28 am ]
Post subject:  Engine Block Oiling System Prep

Here is a view if the SL6 engines oiling system and passageways.
Our goal will be to get the system to flow the greatest amount of oil with the lease amount of passageway restriction. High flow at lower pressure uses less HP and keeps the oil pump drive gear "happy".

Image

Take note on how the block is drilled from the main bearing, up past the cam bearing and into the main oil gallery. Most of our work will be around these passages. (4 total, one for each main bearing)
This drawing does not show the fact that these drilled oil passages intersect with the bottom of main bearing cap bolt hole, on the camshaft side. The passageway can be "choked-off" if longer main studs or main bolts are installed.

The best way to check these passages is to drill through them with a 5/16 (.312) long shank drill, with the cam side main bolt / stud installed. ( I have a spacer that is the same height as the main cap, it's really a piece of an old SL6 main cap) :roll:

Image

Image

You will find that the drill will hit the sides of the cam bearings so I do the drilling before installing new cam bearings. Try to get the drill to deflect off the bearing's shell and cut as much material off the engine block as possible. The goal is to open-up the passageway under the bearing so the new cam bearings do not restrict oil flow, once they are installed.
On high reving engines, I go as far as chamfering the back-side of the new cam bearings to minimize this "pinch point".

Image

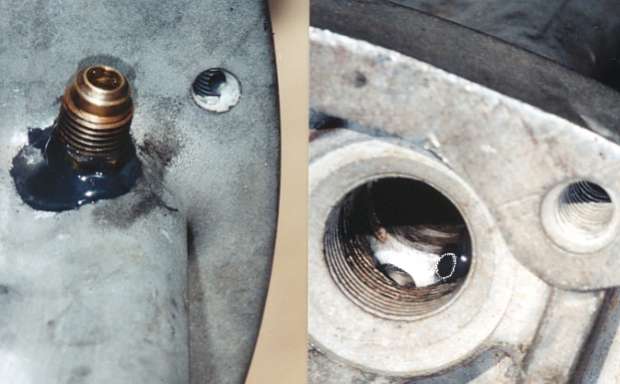
Once you have the drill going all the way thru and into the main oil gallery, it is a good idea to check those intersection points. Remove the front and rear gallery plugs and use a bright light at the oil pump mounting pocket, so you can see how clean and "centered" this intersection point is.

Image

Image

The oil passage holes leading to mains #1 & 4 are right near the end of the gallery and can be seen and deburred (radiused) easily, once the plugs are removed. You can see about 1/2 of the #4 passage hole entrance, just beyond the threads, in the close-up photo on the right. The white area around the hole is fresh cut aluminum (alm. SL6 block) to remove the sharp edge and create a funnel shape, to help the flow of oil around the corner and into the passage.
Image

The intersection points for mains #2 & 3 are deeper in the gallery and difficult to see... and even harder to deburr. Stick the drill through the passage and "backlight" it, to see if the whole drill point is visible. I see many blocks were the drilled oil passageways only partially breaks-out into the gallery, causing restriction and oil flow problems to the mains that need the most oil flow. (mains #2 & 3 have to supply 2 connecting rod bearings, mains 1 & 4 only "feed" oil to 1)

I have a long extension that allows me to reach those passageway intersection points with a "ball burr" and radius the entry by "feel". We have considered drilling access holes, right into the side of the block's main gallery, then threading the hole and installing pipe plugs, in order to get better access and accuratly open-up the areas of concern.

The next sharp corners to "blend" are found where the oil pump mounts to the block. The sharp edges of the casted pocket should be opened-up and "blended" where the drilled gallery passages break into the pocket.

Image

That does it for the the engine block but there is still work to do inside the oil pump (port and "blue print" the pump) and at the crankshaft.
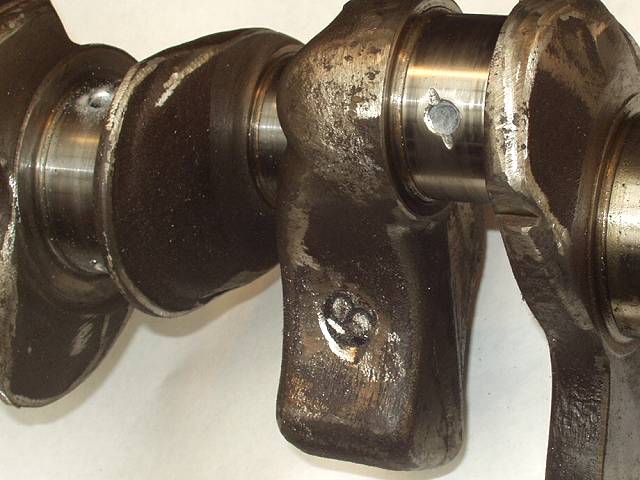
It is a good idea to drill through all the cross-holes in the crankshaft, to be sure those holes are clean and smooth. Also, radius the ends, so the oil can flow in / out smoothly.

I hope this info. is helpful and solves your bearing failure problem.
DD (a responce to a Privet Message asking about early bearing failure)
Image

Image

Image

Author:  Rick Covalt [ Tue Jul 22, 2008 7:46 am ]
Post subject:  Bit

Doug,

Is there anything to worry about with the drill bit grabbing and/or breaking off inside the block? I know how my luck goes!

Rick

Author:  Doc [ Wed Jul 23, 2008 8:44 am ]
Post subject: 

Use a variable speed drill and go slow. If a spot grabs, run the drill bit backwards while pushing and that will help clear the "step".

I have never broken a drill while doing this mod.
DD

Author:  '74 Sport [ Wed Aug 27, 2008 10:55 pm ]
Post subject: 

One other place to check for a plugged oil passageway - found out the hard way - is the one down in the bottom of the rear rocker shaft mounting pedestal. Once the rear shaft hold-down bolt is removed, you gain access to the oil passageway, which actually comes up at an angle through the outboard inner wall of the bolt hole that's drilled into the pedestal. Rod out any cooked and caked in gunk with a stiff pipe cleaner or maybe a brass brush, like those in a gun cleaning kit (for a .22 cal).

Jerry

Author:  Rug_Trucker [ Mon Mar 23, 2009 6:52 pm ]
Post subject: 

Is there a description of the oil pump mods?

Author:  Doc [ Wed Mar 25, 2009 9:39 am ]
Post subject: 

In the SL6 oil pump, I drill all the passages oversize and break all the sharp edges so the oil flows thru the pump more freely.
Setting the impeller clearances and setting the releaf valve (pressure) are also part of the "blueprinting" process.
I top-off my reworking with a case hardened drive gear.
The biggest challenge is having all the special drills and cutters needed to get into all the long passageways and tight spots inside the pump.
DD

Author:  805moparkid [ Thu Dec 17, 2009 10:25 am ]
Post subject: 

[quote] In the SL6 oil pump, I drill all the passages oversize and break all the sharp edges so the oil flows thru the pump more freely.
Setting the impeller clearances and setting the releaf valve (pressure) are also part of the "blueprinting" process.
I top-off my reworking with a case hardened drive gear.

The biggest challenge is having all the special drills and cutters needed to get into all the long passageways and tight spots inside the oil pump.
DD [/quote]

Do you just press a new gear on or is there a different oil pump?

Author:  Doc [ Thu Dec 17, 2009 11:45 am ]
Post subject: 

Most of the "blueprinted" oil pumps I do start as new DynaGear or Melling pumps with the 7/8 thick impeller. (medium volume "5 bolt hole" pumps)
I have also built these in the 5/8 and the 1 inch thick impeller sizes so it really does not matter which pump you start with.

The key is having all the tools, knowing where to grind and how to set the clearances.
The other important part of the reworking is replacing the drive gear with a case hardened gear, so you don't run the chance of gear failure due to a soft material drive gear.
DD

Author:  Greg Ondayko [ Thu Dec 17, 2009 2:37 pm ]
Post subject: 

I have pressed on the hadened gear - Doc, how do you set the pressure on the relief valve?

I will be doing this to a pump for ruster racer.

So I am looking for more detailed instructions.

Greg

Author:  Doc [ Thu Dec 17, 2009 3:36 pm ]
Post subject: 

I have a chart of spring length measurements that corrospond to psi... in "standard clearance" (standard oil demand) SL6 engines.
Basically, you shim (or stretch) the spring to get the desired psi.
DD

Author:  Dart270 [ Fri Dec 18, 2009 8:06 am ]
Post subject: 

I put one or two washers (0.070" thick each) inside the spring cover to apply a little more tenstion to the stock spring. This gets me in the 55-65 psi (@ >4000 RPM) range depending on spring and 1 or 2 washers.

Lou

Author:  OleSkoolTony [ Wed Jan 29, 2014 8:39 am ]
Post subject:  my 225 block

i would really like to do all this work to my 225 block ...

only issue is, i already sent my block off the the machine shop.

i got it back bored 40 over ... freeze plugs and cam bearings installed.

can i still apply this process to my block?

or do i run the risk of ruining something by tying this mod at this point in my build?

thanks -tony

Author:  Doc [ Wed Jan 29, 2014 10:52 am ]
Post subject: 

You can (and should) do everything except drilling the feed holes to the main bearings... the drill will "chew-up" your new cam bearings.
DD

Author:  OleSkoolTony [ Wed Jan 29, 2014 11:43 am ]
Post subject:  thanks

thank you very much doc! :bow:

ill bother my guy about removal and reinstallation of the cam bearings if its worth it, i want my engine to be as "happy" as possible.

this i my first engine build, id hate to not do everything right.

Author:  Doc [ Wed Jan 29, 2014 12:14 pm ]
Post subject: 

There is a "pinch point" where the cam bearings intersect the oil passageway, down to the main bearings (and crankshaft con rod bearings) so it is an important area to review.

Truth is, the stock configuration is fine for street & mild performane SL6 engines that will not see over 5000 RPMs.

The oil flow / volume past the cam bearings / cam becomes more important with high RPM "race" SL6 engines so you decide if it is worth the extra effort to "re-do" the cam bearings, in order to improve the volume of oil getting past the cam bearings / cam and down to the crankshaft.
DD

Page 1 of 2 All times are UTC-08:00
Powered by phpBB® Forum Software © phpBB Limited
https://www.phpbb.com/