Slant Six Forum
https://slantsix.org/forum/

2x - 1bbl choke setup
https://slantsix.org/forum/viewtopic.php?t=57671
Page 1 of 2

Author:  dpstark2 [ Mon May 11, 2015 1:36 pm ]
Post subject:  2x - 1bbl choke setup

Hi,

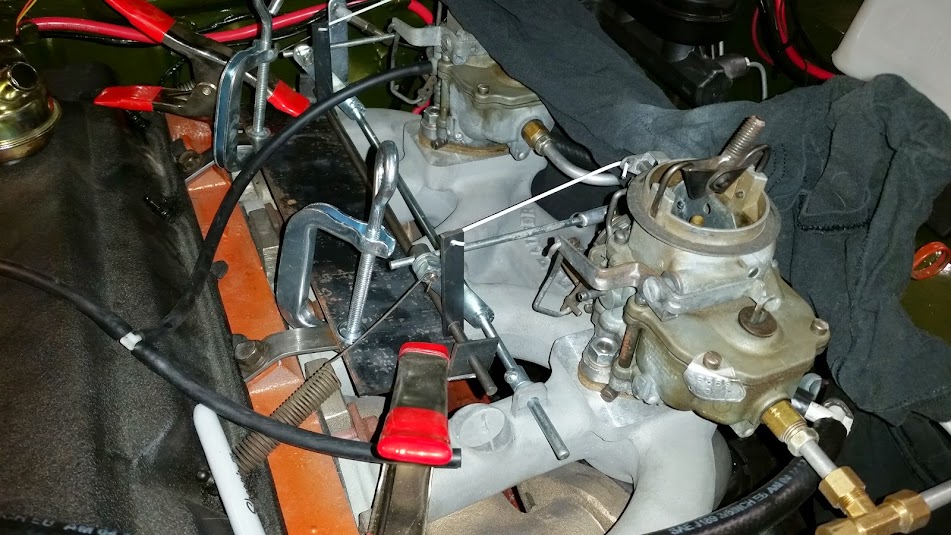
My Dart is doing great with its split dual 1-bbl Offy manifold and two 1-bbl carbs. Throttle response is good, motor works great, fueling is good. The issue is that I currently have no choke. It makes cold starts pretty annoying. Since it's a 4-speed, I can baby it to life without too much trouble, but it's far from the get-in-and-go car I want it to be.

I have one of the electric assist divorced choke units and Pierre and I have tried to make it drive both carbs. It doesn't work. The Y-shaped rod cocks to one side or the other, and nothing will get it to close both choke plates easily.

Has anyone made a working dual choke setup for this manifold? At this point, I'm kind of down to two separate electric chokes or two separate cables. Neither thrills me, but at this point, I think I'd prefer two electric chokes so the pull-off will still work. It also eliminates the ugly choke cables.

Thanks.

Image

Image

Author:  SlantSixDan [ Mon May 11, 2015 1:50 pm ]
Post subject: 

When you're done taking a big bow for that awesome air cleaner, see here (holy carp…posted a decade ago!!) for how to set up the choke.

Author:  dpstark2 [ Mon May 11, 2015 2:16 pm ]
Post subject: 

Thanks a lot for the compliment. That's an early picture, and it's completely done, filled, and painted now. It's kind of a joke because we have 2 hemi cars in the family and I'm the odd one out. I catch a lot of crap for cutting up that air cleaner base, but let me tell anyone listening it was cut up when I got it!

That is what we tried to do with the electric assist choke. Nothing I did could get it to close both chokes evenly. And we spent a few days tinkering at it... All I can say is the spring in the electric assist choke isn't firm enough to keep the rod from twisting a bit. So one side closes, travel stops, and the other side stays open. Maybe I'm missing something? I don't have a picture to post of that setup.

Any opinion if two electric assist chokes would stay synchronized opening up? Any chance of using only one heat sensor on two of those?[/i]

Author:  Reed [ Mon May 11, 2015 2:24 pm ]
Post subject: 

You adjusted the black housing to increase the spring tension on the choke thermostat, right?

Author:  dpstark2 [ Mon May 11, 2015 2:30 pm ]
Post subject: 

Yes. Even when it "sort of" worked, it just wasn't consistent side to side.

If the overwhelming consensus is it should work, I'll try it again. Just given the nature of how it's set up, I don't see it working well for a daily driver.

Maybe the stock choke like the picture is a more direct push on the rod instead of the right angle exit of the electric assist choke?

Author:  SlantSixDan [ Mon May 11, 2015 2:31 pm ]
Post subject: 

Quote:
Thanks a lot for the compliment. That's an early picture, and it's completely done, filled, and painted now.
Any chance you photo-documented the build?
Quote:
That is what we tried to do with the electric assist choke. Nothing I did could get it to close both chokes evenly. And we spent a few days tinkering at it... All I can say is the spring in the electric assist choke isn't firm enough to keep the rod from twisting a bit. So one side closes, travel stops, and the other side stays open.
You need to use stiffer, more bend-resistant rod stock. You may also need diagonal braces at the corners to prevent this kind of twist.
Quote:
Any opinion if two electric assist chokes would stay synchronized
Very likely not.
Quote:
Any chance of using only one heat sensor on two of those?
That would double the current load through the thermal ground resistor; I don't think it would work well or last long.

Author:  Reed [ Mon May 11, 2015 2:38 pm ]
Post subject: 

Any chance you could post a picture or two of your current choke system? Maybe we could help troubleshoot.

Author:  Pierre [ Mon May 11, 2015 2:40 pm ]
Post subject: 

Our attempt had the common leg of the Y much closer to one carb then the other. That pic has it slightly towards the rear carb, but not nearly as much as our attempt. I think we were forced to offset it because we had mounted the electric thermostat on one of the lifting bolts. Working around the air cleaner is a challenge too.

If we center the common leg we may be able to get away with using thinner rod. This will make it more lightweight and easier on the thermostat. It won't have to be as rigid if the thermostat is pushing more towards the center.

Edit1: We initially used 3/32" (or was it 1/16?) tig filler rod, then 1/8" rod. The cross bracing idea is a good thought, but if we can find a way to center things most of the issues should solve themselves. It's running dual dutra duals, so we don't have a stock choke pocket to mount things on.

Edit2: The stock choke setup/mount is shorter, allowing a steeper angle the rod sits at. This may have something to do with it.

Author:  dpstark2 [ Mon May 11, 2015 2:40 pm ]
Post subject: 

Here's the photo album, which doesn't have the final product. I should snap a few shots and put them up there. I went through a couple different base designs before ending up with the final version.

https://plus.google.com/photos/10426738 ... tmY46PC7gE

I'll give it a shot, but when I say twist, I'm not referring to the Y shaped rod bending, but rather the whole deal sort of pivoting about the output of the black choke coil cover. The end of the coil spring doesn't seem strong enough to keep the whole deal straight, if that makes sense. In order for it to work, it seems like the pressure would have to drive exactly the middle of the Y shaped rod, and any imbalance side to side would quickly cause problems.

Thanks for all the advice. I'm looking forward to trying again.

Author:  SlantSixDan [ Mon May 11, 2015 2:57 pm ]
Post subject: 

Oog, yeah, that mounting location for the choke thermostat is going to louse up the angles and create much larger loads on the choke pushrod than can effectively be tolerated. Suggest you fabricate a strong bracket of one kind or another to attach to the lifting bolt (or to two intake runners…use your imagination) to put the choke thermostat either above the #4 exhaust runner where it originally lived, or centred atop the #3 and #4 intake runners. That will give you a much easier starting point to work from.

Your photo album gives me every confidence bracket fabrication will be no sweat for you. I am envious of your fabrication skill!

Author:  Reed [ Mon May 11, 2015 3:09 pm ]
Post subject: 

This will be hard to visualize without a picture, but it sounds like the fact that the choke thermostat rod will be offset more towards the firewall and not centered exactly in the middle of the choke linkage will result in uneven force being applied to each carb. My suggestion, and possibly not the easiest solution, would be to create two struts with collars that would go around the rod between the carbs that would stabilize the linkage rod and prevent it from twisting. Basically that the rod between the chokes on the carbs as a crankshaft and fabricate two bearings to hold the rod on a constant and secure centerline. That way the rotational movement of the rod should be transferred to the chokes evenly.

Author:  dpstark2 [ Mon May 11, 2015 3:15 pm ]
Post subject: 

Thanks again! This car has been good for fabrication skills. I did the whole exhaust from the two manifolds out the back, changed a partial floor pan, made seat brackets, and made that intake. Most of my other fabrication has been small mill and lathe work. This one is mostly large scale stuff.

The suggestion by Reed is another option I thought about. In fact, the whole throttle rod setup is not strong enough. It already twists under force from the throttle cable, leading to uneven opening of the front and rear carbs. I already planned to rebuild that linkage with heim joints and screw adjustments, so this may result in a complete redesign with concentric choke torque shafts and throttle shafts. We'll see. The simpler design is worth one more shot since I have enough scrap to give it a go. The other option will have to wait until funds allow.

Author:  65 dartman [ Mon May 11, 2015 7:06 pm ]
Post subject: 

Quote:
Here's the photo album, which doesn't have the final product. I should snap a few shots and put them up there. I went through a couple different base designs before ending up with the final version.

https://plus.google.com/photos/10426738 ... tmY46PC7gE
I like it! Well Done!

Author:  dpstark2 [ Fri May 15, 2015 7:23 am ]
Post subject:  Progress

Ok- here is what I've come up with so far. It's a plate that mounts on arms to the two lift bosses on the head. A rod with two arms will activate both chokes. One arm, ideally, will also connect to the choke output rod, which will need to be shortened a bunch.

Image

Image

It's all just clamped together right now, and I used a coat hanger for the arm-to-choke rod. That will need to be made adjustable, similar to the throttle linkage.

Image

The pivots for the rod are just pieces of angle iron right now. I'll need to put a bushing in there (Delrin or bronze, probably) to keep it pivoting. It will also help with installing the rod.

Image

The arms on the rod may need to be shorter too in order to clear the air cleaner. It's hard to gauge with all the clamps in place. At most, they need to be an inch shorter. I may also be able to lower that plate a bit or make a better mounting system.

Also, here is the finished air cleaner base. It's dirty! It gets used!

Image

Full-size pics are here: https://plus.google.com/photos/10426738 ... tmY46PC7gE

Author:  '67 Dart 270 [ Fri May 15, 2015 7:43 am ]
Post subject:  yep, that air cleaner caught my eye as well...

awesome job on the air cleaner...for the V8 naysayers that bemoan the "destruction" of the base, I figure the air cleaner finally ended up where it belonged...

brian

Page 1 of 2 All times are UTC-08:00
Powered by phpBB® Forum Software © phpBB Limited
https://www.phpbb.com/