Quote: Yes, I wanted to cut one open to see how existing designs solved some of the challenges I found working on a voltage regulator from scratch. Exactly how close my final design comes to this will depend on just how big a priority people find the possible ways it can be improved.
So, first, here's what they did well with this regulator.
The soldering work on the PCB itself is first-rate. I'm guessing it was run on an automated production line using solder paste and a reflow oven. It's not impossible to hand place components like this, but getting them placed that precisely isn't easy. And the solder joints are almost certainly not hand-soldered with an iron.
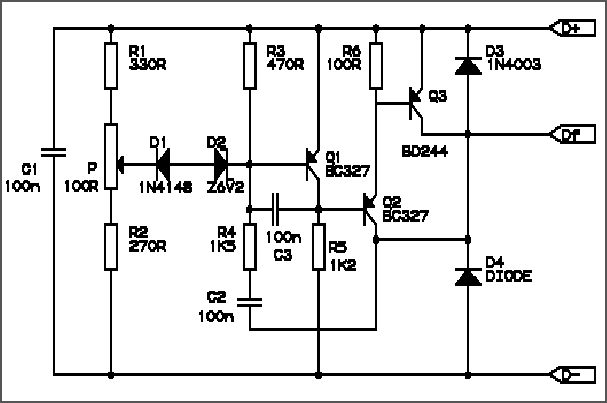
The circuit itself is a very simple design with not much to go wrong and not much that can kill it. The most likely things that could damage the circuit are water intrusion or an alternator field coil that draws more current than the power transistor can handle. Unfortunately, I could not find any markings on the power transistor, so I don't know what its maximum current is. Even though there aren't any discrete components for protecting it against voltage spikes, this circuit should be able to withstand spikes to 40 to 60 volts without any problem, possibly even higher.
And here are the areas of concern.
While the PCB soldering is done very well, the wire soldering is second-rate. While the joints look functional, their technician seems to subscribe to the idea of "The bigger the blob, the better the job." The conformal coating job was also done poorly, leaving many areas of the board uncovered.
I don't like the idea of a sand filled box. Sand filled electronics have valid applications where there's a concern about a box getting filled with explosive gas, such as natural gas pipeline stations, but that doesn't apply here. While this box didn't show any signs it would leak, if you made a mistake like leaving a big greasy fingerprint around the area where the urethane fills the box, it's game over. On the upside, it does make teardowns easier - perhaps their warranty department insisted on this. It's not an unacceptable way to build electronics, but I don't like it.
As noted before, there's no temperature compensation. It runs at a fixed voltage.
And then there's the issue of tolerances. The resistors are cheap 5% tolerance pieces. Zener diode voltage tolerances are also around 5% unless you spring for something special. Theoretically, you could stack the tolerances so the voltage is off by 15%. That is unlikely to happen in practice, but it is theoretically possible. Most of these are probably going to be within 5% of their target voltage.
Heat sinking isn't ideal, but this circuit doesn't put out a lot of heat, either.
Last, areas where it could be improved.
Chrysler's original design used a thermistor to increase output voltage at low temperature.
An adjustable target voltage isn't necessary if the regulator is always at the voltage where it needs to be. Also, different batteries have different target voltages. 13.8 volts on a lead-acid battery may not charge quite as fast as higher voltage, but it reduces corrosion on terminals. However, a lithium-ion battery won't charge if the voltage is below the mid-14s.
Some other improvements wouldn't match factory Mopar wiring. For example, allowing the regulator to wire directly to the battery positive and ground would give a more accurate voltage reference, but you'd need a separate way to switch power so it doens't hold the alternator on. You could also add an alternator warning light output if it cannot hit its target voltage. Neither of those would work with a schematic at all like the one shown, but it's definitely possible.
1) I would expect the temp compensating feature would assist in improved ignition performance under cold start/run, electric-assist choke function, & battery charge recovery after hard cold starts.
2) Referencing at the battery is great for the battery, but short-changes all systems at the point of their regulated voltage connection, so referencing the ign."ON" provides full voltage to the components. As such, this is also the cause of common overcharging when bulkhead/column/ign.sw./splice connections are sub-standard, but the solution is correction(sometimes hard work), not an elegant crutch.
3) Thank You for investing Your time to learn & share with the Forums, look forward to the progress.
|